


13 Website Speed Optimization Hacks for WordPress
As more and more businesses are having an extensive online presence, the importance of website speed is becoming increasingly obvious.
When it comes to creating a website, there are many things to consider – the overall design, content, and Search Engine Optimization (SEO). But the most important factor is the performance of your website.
Why is website performance important?
According to the surveys done by Akamai and Gomez.com:
- Almost half of the web users expect a website to load in 2 seconds. Users abandon a website that doesn’t load within 3 seconds
- 79% of online shoppers say that they won’t buy and return to a website that has issues with performance
- 44% would inform their friends of their poor shopping experience
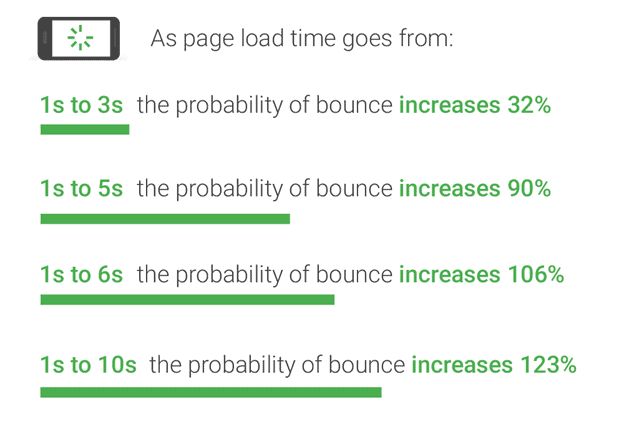
Also, page load time on mobiles has a surprising effect on the bounce rate and more. Think With Google conducted an experiment and published the following:
- 79% of pages were over 1MB
- 53% over 2MB
- 23% over 4MB
- Among the industry sectors who have websites, retail, travel, and healthcare are the ones who need to improve their website performance
Here are some of the surprising insights they published regarding the connection between page load time and bounce rate.
How to make pages load faster?
Improving the speed of WordPress websites can be quite tricky because of the way 3rd party plugins operate and how scripts are enqueued.
We are going to discuss some of the best speed performance practices to optimize your website. All the steps will give you an idea of how to improve page speed without relying on plugins.
Hopefully, by following these guidelines, you’ll be able to improve your website speed.
1. Optimize images
Images often occupy a significant amount of visual space on web pages. Optimizing images will result in saving bytes and performance improvement.
Here are some tips that will help you optimize images on your website.
- Compress all the images with the help of Compressor.io and TinyPNG. These free tools can reduce the file size by 80% without damaging the quality of the images
- Reduce the image to a minimal dimension without decreasing the image quality. The size of the images must not be reduced using CSS or HTML tags
- Specify image dimensions to help browsers render web page layouts easily
We download all the images and manually compressed them. Once you optimize the existing images, make it a point to optimize the new images before uploading.
2. Eliminate render-blocking JavaScript and CSS in above-the-fold content
The JavaScript or CSS that blocks your website from rendering on the browser is known as render-blocking Javascript and CSS files. This suggestion is displayed when HTML references block external JavaScript in the above-the-fold portion of your page.
So how do you remove render-blocking JavaScript?
Google recommends the following solutions.
- Async loading of JavaScript
To load JavaScript Asynchronously, the ‘async’ attribute must be added. For example, <script async scr =”abc.js” >
- Defer parsing of JavaScript
This simply means holding the JavaScript while other critical resources (HTML, CSS etc.) have completed loading.
- Inline JavaScript
Inline JavaScript is nothing but calling the whole JavaScript instead of calling it by name. For example,
<html>
<head>
</head>
<body>
<div>
Hello, world!
</div >
<script type=”text/javascript”>
/* contents of abc JavaScript file */
</script >
</body>
</html>
3. Minify HTML, CSS, and JavaScript
Minify basically means removing unnecessary characters which the code doesn’t need to execute. The process removes white space characters, new line characters, comments, and blocks delimiters.
You can do this work with the help of minifying tools. Here is a list of tools that will help you minify and combine files.
(A) Closure tools – A series of tools from Google Developers which will help to speed up JavaScript code. Some of them include
- Closure Compiler – A JavaScript optimizer that rewrites your code and minimizes unwanted space
- Closure Linter – Checks for issues such as operator placement, missing semicolons, spacing, etc
- Closure Stylesheets – Concatenates and minifies a list of stylesheets including vendor-specific stylesheets (WEBKIT, MOZILLA, OPERA, MICROSOFT, and KONQUEROR)
(B) CSS Minifier –Removes spacing, indentation, new lines, and comments from CSS code
(C) JavaScript Minify Tool – Another tool similar to CSS Minifier
(D) JavaScript Minifier –Minifies CSS and also has a JPEG optimizer and image resizer(E) Online JavaScript/CSS Compressor – Minifies your CSS, HTML, and JavaScript using UglifyJS 2, Clean-CSS and HTML Minifier
4. Leverage browser caching
You can enable ‘Leverage Browser Caching’ in WordPress by,
- Adding Expires Headers
It is recommended that you set expiry dates for a year. Less than one month or more than a year is not recommended. Once you set it, you have to add Cache-Control Headers in .htaccess file.
# TN – START EXPIRES CACHING #
ExpiresActive On
ExpiresByType text/css “access 1 month”
ExpiresByType text/html “access 1 month”
ExpiresByType image/gif “access 1 year”
ExpiresByType image/png “access 1 year”
ExpiresByType image/jpg “access 1 year”
ExpiresByType image/jpeg “access 1 year”
ExpiresByType image/x-icon “access 1 year”
ExpiresByType application/pdf “access 1 month”
ExpiresByType application/javascript “access 1 month”
ExpiresByType text/x-javascript “access 1 month”
ExpiresByType application/x-shockwave-flash “access 1 month”
ExpiresDefault “access 1 month”
# TN – END EXPIRES CACHING #
- Add Cache-Control Headers
It states the caching period of a particular file by a web browser. You can specify timeline in Cache-Control Headers.
# TN – BEGIN Cache-Control Headers
<ifModule mod_headers.c>
<filesMatch “\.(ico|jpe?g|png|gif|swf)$”>
Header set Cache-Control “public”
</filesMatch>
<filesMatch “\.(css)$”>
Header set Cache-Control “public”
</filesMatch>
<filesMatch “\.(js)$”>
Header set Cache-Control “private”
</filesMatch>
<filesMatch “\.(x?html?|php)$”>
Header set Cache-Control “private, must-revalidate”
</filesMatch>
</ifModule>
# TN – END Cache-Control Headers
- Turning ETags Off
ETag verifies the changes in the cached and requested resources.
# TN – BEGIN Turn ETags Off
FileETag None
# TN – END Turn ETags Off
Once you complete the above steps, you have enabled ‘Leverage Browser Caching’ via .htaccess.
5. Combine images using CSS sprites
Basically, sprites combine several images into one image so that web pages can be displayed quickly. For example, instead of downloading six images, your webpage will download only one. This is the beauty of sprites, it reduces server requests.
6. GZIP compression
GZIP, the file format and software application used for file compression and decompression are probably one of the easiest optimizations you can do on WordPress. It helps reduces the size of your HTML, stylesheets, and JavaScript files.
You can enable Gzip compression by editing your .htaccess file. Most of the hosts use Apache, so you can simply add the below code to your .htaccess file at the root of your WordPress website via FTP.
<IfModule mod_deflate.c>
# Compress HTML, CSS, JavaScript, Text, XML and fonts
AddOutputFilterByType DEFLATE application/javascript
AddOutputFilterByType DEFLATE application/rss+xml
AddOutputFilterByType DEFLATE application/vnd.ms-fontobject
AddOutputFilterByType DEFLATE application/x-font
AddOutputFilterByType DEFLATE application/x-font-opentype
AddOutputFilterByType DEFLATE application/x-font-otf
AddOutputFilterByType DEFLATE application/x-font-truetype
AddOutputFilterByType DEFLATE application/x-font-ttf
AddOutputFilterByType DEFLATE application/x-javascript
AddOutputFilterByType DEFLATE application/xhtml+xml
AddOutputFilterByType DEFLATE application/xml
AddOutputFilterByType DEFLATE font/opentype
AddOutputFilterByType DEFLATE font/otf
AddOutputFilterByType DEFLATE font/ttf
AddOutputFilterByType DEFLATE image/svg+xml
AddOutputFilterByType DEFLATE image/x-icon
AddOutputFilterByType DEFLATE text/css
AddOutputFilterByType DEFLATE text/html
AddOutputFilterByType DEFLATE text/javascript
AddOutputFilterByType DEFLATE text/plain
AddOutputFilterByType DEFLATE text/xml# Remove browser bugs (only needed for really old browsers)
BrowserMatch ^Mozilla/4 gzip-only-text/html
BrowserMatch ^Mozilla/4\.0[678] no-gzip
BrowserMatch \bMSIE !no-gzip !gzip-only-text/html
Header append Vary User-Agent
</IfModule>
7. Optimize the order of styles and scripts
The order of styles and scripts can be optimized by changing a few lines of code. ‘Head’ section is the area where the styles and scripts are called. Here is an example of optimizing the order of inline styles and scripts.
<head>
<title>title</title>
<style>
css code goes here
</style>
<script>
javascript code goes here
</script>
</head>
8. Fix all broken links
Broken links drain your bandwidth, make users leave your website, and hurt your SEO efforts. There are two types of broken links on your website.
(A) Internal links
Internal links are the ones you can control on your website. Whenever you update or make any changes to your website, always check if the internal links are working.
(B) External links
External links or outbound links are the links that point to another website for reference. You have to spend more time checking the external links because you will have no control over it. So, you have to check it from time to time to see if they are working.
To identify broken links, we recommend using the following free tools.
- Google Webmaster Tools (crawl errors tab)
- Screaming Frog SEO Spider
- Ahrefs
9. Link to your stylesheets, avoid using @import
@import has a negative impact on web page performance. Directly linking to both your stylesheets and @import achieves the exact same results, but the former utilizes fewer resources than the latter. Plus some of the old versions of browsers do not support @import, so it’s best to avoid it.
10. Reduce redirects
Even though 301 redirects are permanent, too many redirects slow down the time it takes the browser to reach the original version of the page. No matter the reason, redirects always triggers an additional HTTP response and adds up the round-trip-time latency.
Screaming Frog is one of the best tools that help to identify 301 redirects.
11. Enable HTTP Keep-Alive
HTTP Keep-Alive is the message that is sent between the client machine and web server asking for permission to download a file.
By default, HTTP connections close after each request. So if a user visits your website, their browser has to create a new connection to request the files in your web pages (e.g. images, Javascript, and CSS stylesheets). This process can lead to a higher page load time.
If you enable Keep-Alive, user machines will not repeatedly request to download multiple files. This will also help to save bandwidth.
To enable Keep-Alive, paste the below code into your .htaccess file.
<ifModule mod_headers.c>
Header set Connection keep-alive
</ifModule>
12. Prevent hotlinking of images
Hotlinking or bandwidth stealing is a common problem that many faces. It happens if others use images/files of your website.
To prevent others from hogging your bandwidth and slowing your website, you have to add the below line of coding into your .htaccess file.
RewriteCond %{HTTP_REFERER} !^$
RewriteCond %{HTTP_REFERER} !^http://(www\.)?example.com/.*$ [NC]
RewriteRule \.(gif|jpg)$ http://www.example.com/hotlink.gif [R,L]
In the above example, you have to change ‘example.com’ to your website URL.
13. Remove the plugins you don’t use
Usually, on WordPress websites, plugins are one of the major reasons behind speed drain. If there are any plugins which you no longer use, delete them.
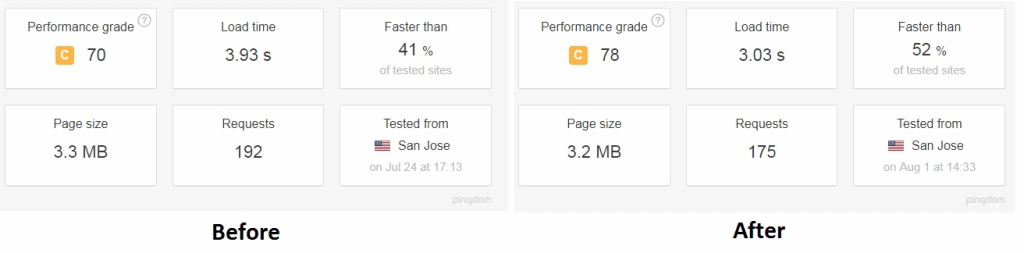
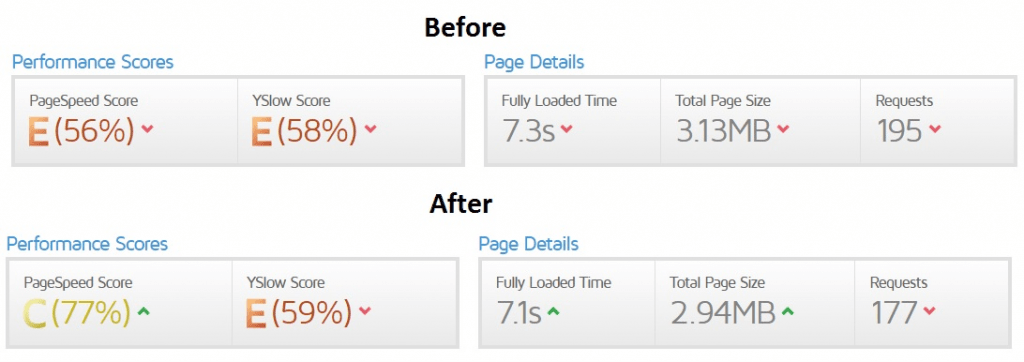
Before and after
After manually going through the above-said points, treating them as a checklist, and implementing it on our client’s website, we experienced noticeable speed improvements.
Google PageSpeed Insights
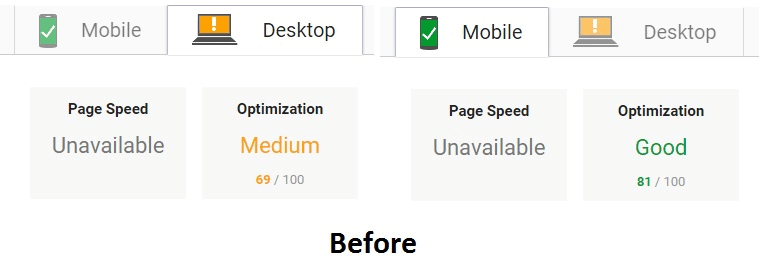
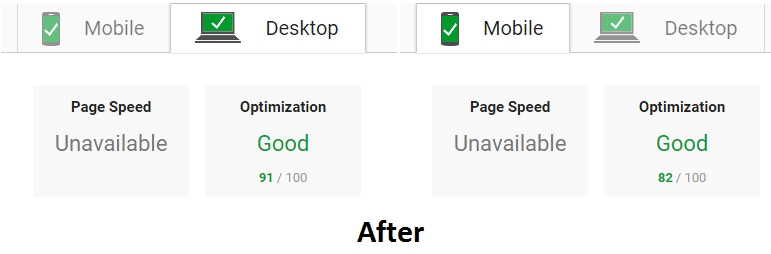
Pingdom
Gtmetrix
Other factors that help to improve website speed
Web hosting
The speed of your website depends on the architecture of your web pages, databases and the speed of your hosting server.
Even though you have to optimize your code and content, the loading speed of your website is highly dependent on your hosting environment.
The page load speed of your website will affect your Google rankings as it has become a part of its ranking algorithm update in 2018.
So going with the right type of hosting service can make or break your website. Quality web hosting will keep your website available around the clock, offer good security options, backup your online files and accommodate your ever growing needs. Also, check out our article on the top 5 WordPress Hosts for local businesses. Please read it before making a decision.
No matter the quality of content and products you offer, poor hosting has a high chance of costing you, customers. When it comes to WordPress, there are many hosting providers you can choose from.
Content Delivery Network (CDN)
A CDN is a geographically distributed group of servers that delivers static content to the end users. It improves the performance of websites by copying static content like images, on-demand video, CSS stylesheets, JavaScript and more to a network of remote servers. When a user requests the content, the data is accessed from the closest server location of the user. This results in fast-loading highly reliable websites.
By using CDN, you can reduce the processing load on your server, lower latency, manage traffic spikes, and avoid downtime.
Do not embed more videos on the website
According to the current trends, video consumption is at its peak. Users love high-resolution videos. But your website must be optimized to handle it because such type of content can cause performance problems. Here are some of the video optimization tips you can follow when adding videos to your website.
- Use data compression tools like Blazemp and HandBrake to reduce the size of the video without degrading its quality
- Remove audio data if you have a hero video with the audio muted. This will reduce file size. If you made the video, you can omit it while exporting or use tools like FFmpeg to remove audio
- Specify the width and height of videos in your HTML or CSS so that it will easy for browsers to allocate the required bandwidth
- Use an online video converter to convert video files to HTML5 formats such as MP4 and WebM. MP4 video formats are supported by all browsers whereas WebM is fully supported only by Chrome and Firefox
- Defer loading videos until the initial page load if you have videos that play automatically
- Embed YouTube videos without increasing the page size by embedding thumbnail image of the YouTube video. The video player will load only when the user clicks on the thumbnail. Click here to know how to do it
If you like to learn more about how to optimize video streaming on your website using HTML5 tags, click here.
In conclusion, website speed should not be overlooked!
We hope that you have found some tips that you can act upon to improve your website speed. If you’re looking to optimize the speed of your WordPress website through plugins, take a look at some of our favorite speed optimization plugins that can help you achieve speed improvements.
Plus, if you are using a page builder like Elementor, there are certain speed optimization points you need to keep in mind. Take a look at our article on Best Speed Optimization Tips for Elementor Website to learn more.
If you want our website speed optimization geeks to supercharge your website do get in touch with us.
What speed optimization hacks improved your website speed? What were the results? We would love to hear from you.